Dreamy Room Level 929
Dreamy Room Level 929 guide - Dreamy Room 929 Walkthrough & Solution.
Important Notice Regarding Level Numbering
Due to frequent changes in Dreamy Room's level numbering and differences between platforms (Android/iOS) – for example, level 929 on Android might not be the same as level 929 on iOS – the text guide below may not always match the images and video above. Please prioritize the image and video guides. If you find that the guide content doesn't match your current level, please visit the All Level Walkthroughs page to find the correct guide based on level images. Thank you for your understanding.
Dreamy Room Level 929 Walkthroughs & Guide
Step 1. Place the Three Arched Wall Structures Along the Back of the Room.
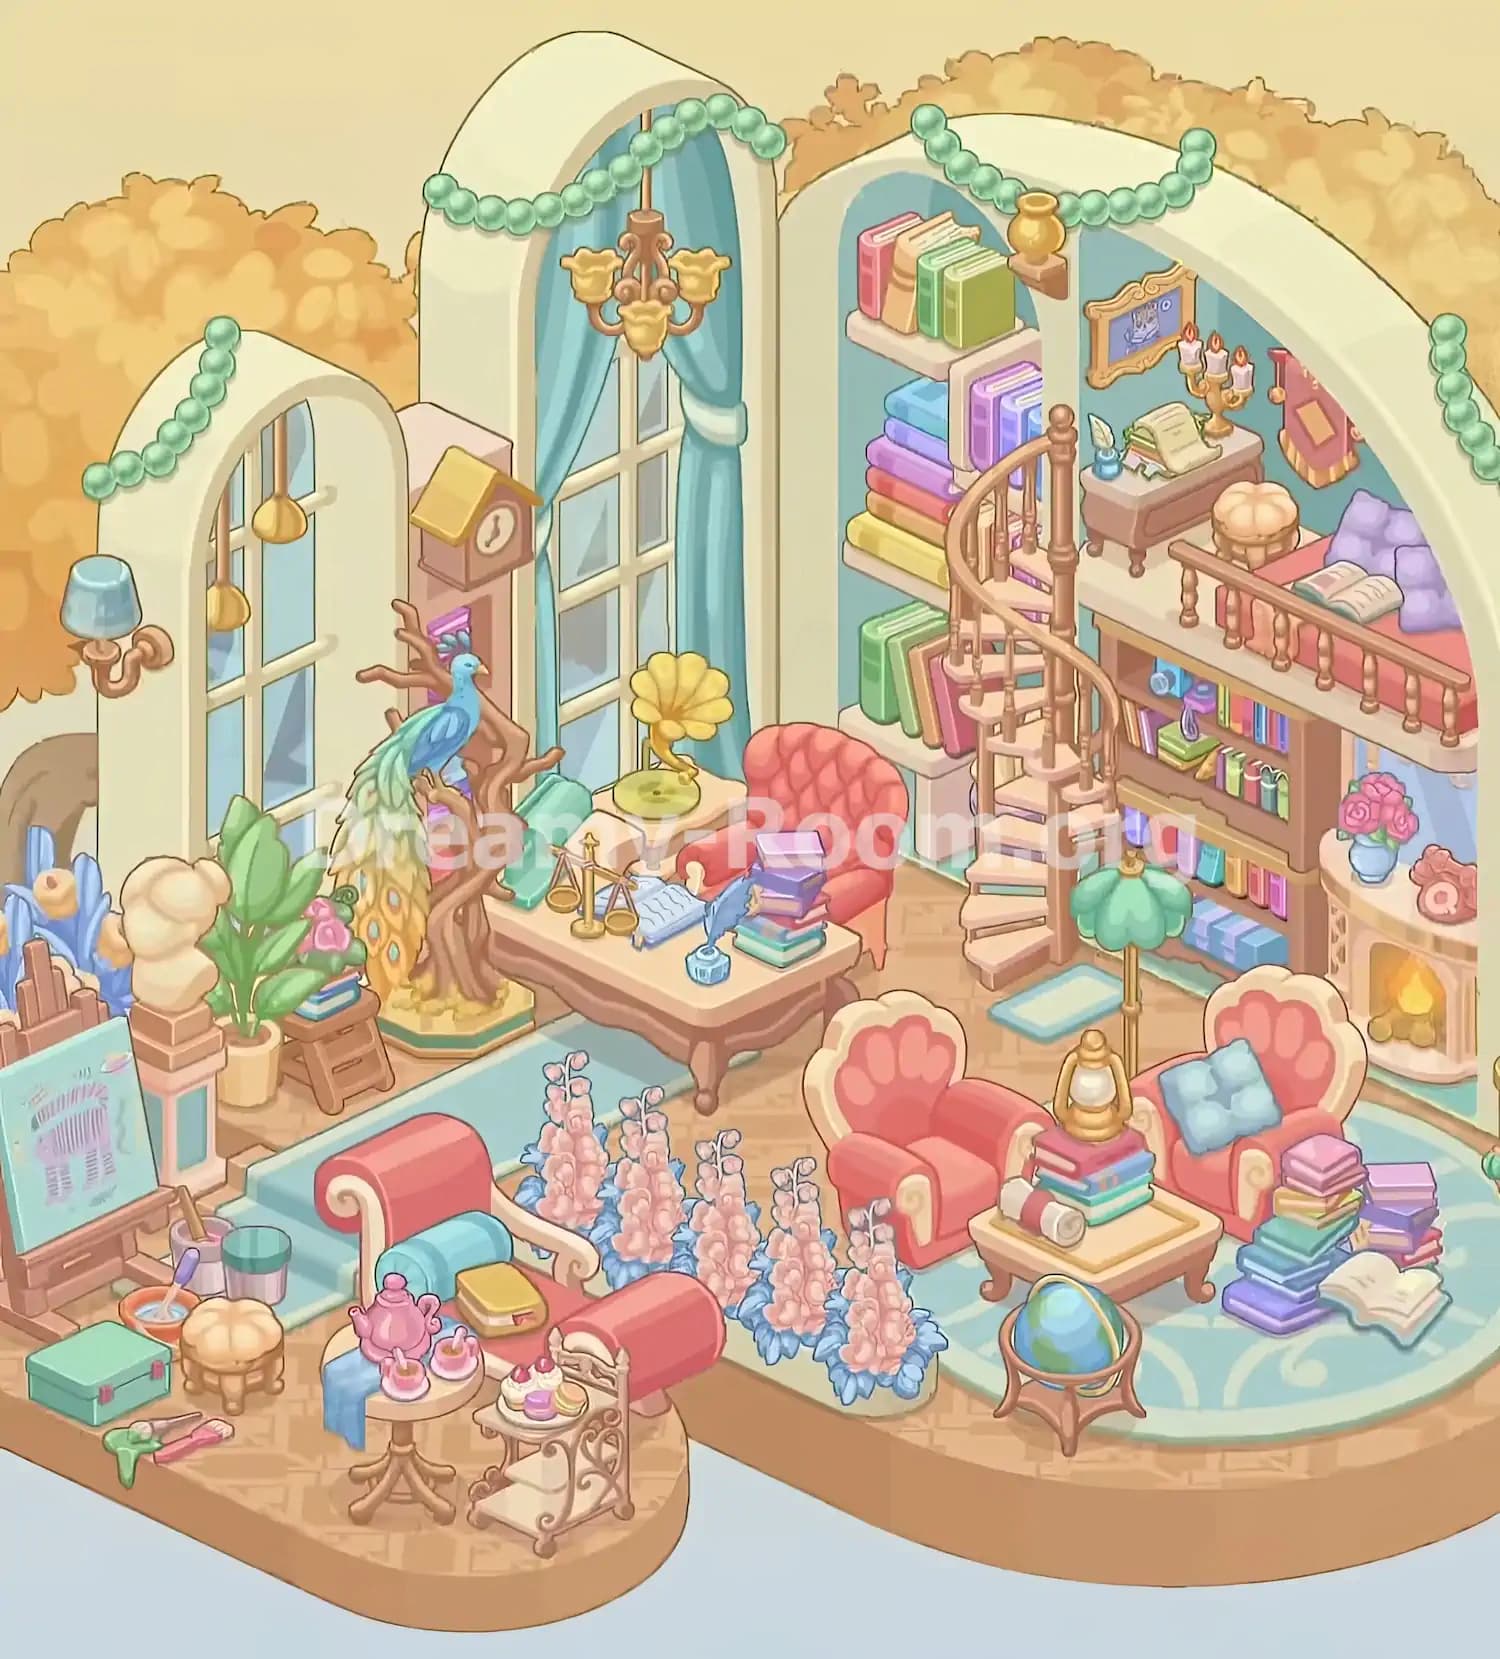
Begin Dreamy Room Level 929 by establishing the architectural background. The empty scene consists of two connected, peach-colored floor platforms surrounded by large autumn trees with golden-yellow leaves. The main platform occupies the center and right side, while a smaller extension projects toward the lower-left corner.
Place the smallest cream-colored arched wall on the back-left side of the platform. This wall contains a tall, narrow window with white crossbars and pale-blue glass. Next, position the tallest arched window structure toward the back-center, slightly behind the future writing desk. Finally, arrange the large curved library wall across the back-right portion of the room.
The right arch should create a spacious alcove for shelves, a spiral staircase, and an elevated reading area. In Dreamy Room Level 929, these three structures establish the room's proportions and determine where most furniture will fit.
Make sure the walls follow the rear edges rather than extending into the central floor. Correct architectural placement makes the remaining Dreamy Room Level 929 decorations much easier to organize.
Step 2. Decorate the Arches with Mint-Green Garlands and Golden Lights.
Once the walls are positioned, add the decorative elements that create the magical atmosphere of Dreamy Room Level 929. Start with the mint-green bead garlands, which hang along the curved upper edges of all three arched structures.
The smallest left arch has a garland draped across its top, with the strands descending on both sides. The central tall arch has a longer garland that follows its rounded frame. The large right arch features another green garland across the upper curve, accompanied by a descending strand along the far-right edge.
Next, attach the blue-shaded wall lamp to the outside-left side of the smallest arch. Add the small golden pendant lights inside its window opening, where they hang at different heights. These details make the left side feel warm and welcoming.
Dreamy Room Level 929 also includes a pinkish wooden grandfather clock with a yellow roof. Position it in the narrow space between the left window and the tall central window, with its clock face facing forward.
Pay attention to the height of each ornament. In Dreamy Room Level 929, decorative garlands belong near the upper architectural borders, leaving the lower walls clear for furniture and accessories.
Step 3. Install the Tall Blue Curtains and Hanging Chandelier in the Central Window.
The central window is one of the most prominent features of Dreamy Room Level 929. Its impressive height helps the room resemble a luxurious storybook library. Begin by placing the tall white-framed window within the central arch, keeping the pale-blue glass panels visible.
Next, install the long turquoise-blue curtains on both sides of the window. The fabric should hang from the upper arch and gather into elegant folds near the middle, exposing most of the window's glass panels. The left curtain sits behind the grandfather clock and nearby decorative objects, while the right curtain falls behind the writing area.
Add the golden chandelier to the upper central section. This ornate fixture features several flower-shaped shades branching outward from a decorative golden stem. It should hang in front of the upper window, above the working area without reaching the desk.
In Dreamy Room Level 929, the chandelier is an important visual anchor connecting the tall architectural background with the furniture below.
Check that the curtains are symmetrical enough to frame the window naturally. Dreamy Room Level 929 looks most accurate when the chandelier remains centered and the curtains do not cover the main window frame.
Step 4. Build the Bookshelves and Spiral Staircase in the Back-Right Library.
The right side of Dreamy Room Level 929 contains the most complex furniture arrangement. Begin by installing the tall, pale wooden bookshelf against the left interior wall of the large right arch. Fill its compartments with colorful books arranged vertically and horizontally. Pink, yellow, green, purple, and blue volumes should occupy the different shelves, creating a bright and organized collection.
Next, place the wider brown bookshelf against the lower back-right wall. This unit holds several rows of smaller colorful books and extends beneath the elevated reading platform. Its shelves should remain visible through the open space below the balcony.
Now position the wooden spiral staircase between these two bookcase areas, slightly right of the room's center. The staircase begins on the main floor and curves upward toward the elevated platform. Its pale steps wrap around a central support, while a wooden handrail follows the outer curve.
In Dreamy Room Level 929, the spiral staircase must connect visually with the upper reading area rather than standing separately.
Check the alignment carefully. Correctly organizing the bookshelves and staircase is essential to recreating the two-level library arrangement shown in the Dreamy Room Level 929 completed image.
Step 5. Furnish the Elevated Reading Platform with Books, a Writing Desk, and Cushions.
Continue Dreamy Room Level 929 by decorating the raised reading platform above the right bookshelf. This small loft occupies the upper-right corner of the room and features a light wooden floor with a matching railing along its front edge.
Start by placing the compact wooden writing desk toward the back-left side of the loft, behind the railing. Arrange an open book or parchment on its surface, with a small blue ink bottle and feather quill nearby. Place the ornate golden three-candle holder on the desk's right side, with the candles pointing upward.
Next, position the small round cream-colored cushioned stool slightly to the right of the desk. Against the back-right wall, create a cozy reading spot using the pink bedding or cushion base, a large lavender pillow, and an open book resting in front of the pillow.
The upper wall of Dreamy Room Level 929 also contains a small gold-framed blue picture and a hanging red banner with golden trim. Place these decorations above and behind the loft furniture.
Finally, confirm that the wooden balcony railing runs along the front edge without blocking the staircase entrance. This elevated reading nook is one of the defining features of Dreamy Room Level 929, so its small items deserve careful attention.
Step 6. Install the Fireplace and Decorative Accessories on the Right Wall.
The fireplace provides a warm focal point for the lower-right section of Dreamy Room Level 929. Position the cream-colored fireplace against the right wall, directly beneath the elevated reading area and beside the large bookshelf.
The fireplace should face toward the front of the room. Its opening contains glowing yellow-orange flames above a small arrangement of wooden logs. Keep the fireplace close to the wall so it does not intrude into the seating area.
On the upper-left corner of the mantel, place the small blue vase filled with bright pink flowers. To the right, arrange the small pinkish decorative object resembling a rolled scroll or ornamental sculpture.
The decorations should sit above the fire opening, creating a balanced mantel display. A small section of blue wall should remain visible behind them.
In Dreamy Room Level 929, the fireplace sits immediately to the right of the ground-floor bookshelf and behind the right-side seating arrangement. This placement ties the library and lounge together.
Avoid confusing the fireplace with a standalone cabinet. Its glowing interior and decorative mantel are important identifying details in Dreamy Room Level 929.
Step 7. Arrange the Main Wooden Writing Desk and Red Armchair Beneath the Central Window.
Now create the main study area in Dreamy Room Level 929. Place the large wooden writing desk in front of the tall central window, slightly to the left of the spiral staircase. Its tabletop extends diagonally across the middle-left section of the room, with the front legs clearly visible.
Behind the desk, position the large coral-red armchair with its rounded, tufted backrest. The chair should face the writing desk, creating a comfortable workspace.
Next, decorate the desk. Place the golden balance scale toward the left side of the tabletop. Arrange the open writing papers or notebook near the center, with an ink bottle and blue feather quill beside them. Toward the front-right corner, place a small stack of colorful books.
Another decorative blue quill and ink bottle should sit close to the book stack. The desk should feel full of scholarly objects without appearing crowded.
The main challenge in Dreamy Room Level 929 is making these tabletop accessories fit in their correct positions. Large furniture can be placed relatively easily, but tiny stationery items require more precision.
When completing this section of Dreamy Room Level 929, keep the chair behind the desk and preserve enough open floor around the front legs for the nearby floral arrangements.
Step 8. Add the Peacock, Gramophone, Potted Plant, and Decorative Sculpture on the Left Side.
The area immediately left of the writing desk contains some of the most distinctive decorations in Dreamy Room Level 929.
Begin with the ornate peacock display. Position the twisted brown tree trunk and branches in front of the lower-left side of the central window, close to the grandfather clock. The blue peacock perches on the branches, facing toward the right. Its long turquoise-and-gold tail cascades downward over the trunk, reaching the square golden base near the floor.
Next, place the yellow flower-shaped gramophone on the small wooden side table between the peacock display and the red armchair. Its large flower-like horn should face outward, with the green gramophone base resting securely on the tabletop.
To the left of the peacock, arrange the tall potted plant with broad green leaves and pink blossoms. Place its cream-colored pot on the floor beside a small wooden stool holding several books.
Near the back-left corner, add the stacked cream-colored ornamental sculpture on its square pedestal. A few blue decorative objects should remain visible behind it.
These artistic accents help distinguish Dreamy Room Level 929 from a conventional library. Their positions also create a smooth transition between the window area and the art studio.
Check the overlapping objects carefully in Dreamy Room Level 929: the peacock should remain visible in front of the branches, and the gramophone must not disappear behind the desk.
Step 9. Lay the Turquoise Rugs and Arrange the Pink-and-Blue Flower Beds.
With the larger decorations in place, focus on the floor layout of Dreamy Room Level 929. The completed scene uses two main turquoise floor coverings to organize the different activity areas.
Position the long rectangular turquoise rug across the center-left floor. It should extend from the front-left seating area toward the main writing desk, creating a soft visual connection between the art corner and library furniture.
Next, place the large oval turquoise rug across the lower-right floor. This carpet features pale decorative swirls and covers the area beneath the two matching pink armchairs, the center table, and the nearby book stacks.
Now add the row of pink-and-blue flowering plants between the left lounge and the right seating area. These tall blossoms rise from low blue-green foliage, forming several closely grouped clusters that run diagonally across the center-front of the room.
In Dreamy Room Level 929, the flower beds function as a natural divider rather than as wall decorations. Keep them near the boundary between the two rugs, with their blossoms visible between the furniture.
The arrangement should resemble a narrow indoor garden. Correct floor layering is important in Dreamy Room Level 929 because the rugs and flowers help establish the exact positions of the remaining chairs and tables.
Step 10. Position the Matching Pink Armchairs and Central Coffee Table on the Right Rug.
The right-side reading lounge is a particularly charming part of Dreamy Room Level 929. Start by placing the two matching pink armchairs on the turquoise oval rug.
Position the first armchair toward the left side of the rug, close to the pink flower bed. Its rounded backrest features a paw-like scalloped pattern, with a pale cream border and a coral-pink interior. The chair faces slightly toward the front-right.
Place the second matching armchair farther to the right, near the fireplace. This chair faces inward toward the center of the lounge and has a soft blue cushion resting against its back.
Between the two chairs, position the low rectangular wooden coffee table. Arrange a stack of colorful books on top, then add a small rolled scroll near the front-left edge. A brass lantern sits above the book stack as the central decorative feature.
In Dreamy Room Level 929, both chairs should appear to surround the table without blocking the fireplace or staircase.
Double-check the spacing before continuing. The seating group is an important landmark in Dreamy Room Level 929, and even a small positioning error can make the remaining books and accessories difficult to arrange.
Step 11. Add the Green Floor Lamp, Globe, Scattered Books, and Reading Accessories.
Continue decorating the right lounge in Dreamy Room Level 929 by adding the smaller objects that make the library feel actively used.
Begin with the tall floor lamp behind the coffee table, slightly left of the right armchair. It features a golden stand and a scalloped green shade. Its base belongs near the back of the turquoise rug, between the staircase and the main seating area.
Next, place the blue-and-green globe in its brown wooden stand near the front-center edge of the rug, directly in front of the coffee table. The globe should sit low enough to remain separate from the lantern above.
To the right of the fireplace-side armchair, arrange several stacks of colorful books. The tallest pile sits directly beside the chair and includes purple, green, blue, pink, and yellow covers. A smaller stack is positioned behind it, nearer the right edge.
Place the open cream-colored book on the floor in front of the book piles, near the outer edge of the turquoise rug.
Dreamy Room Level 929 uses these scattered reading materials to create a relaxed and lived-in atmosphere.
The important detail in Dreamy Room Level 929 is maintaining the relationship between the chairs, coffee table, globe, lamp, and books. Each accessory should be visible without covering the primary furniture.
Step 12. Arrange the Red Chaise, Tea Table, and Dessert Trolley on the Front-Left Platform.
Now turn to the smaller platform extending from the lower-left corner of Dreamy Room Level 929. This area becomes an inviting tea lounge, separate from the main library seating arrangement.
Start by placing the coral-red chaise or lounge chair near the center of the extension. Its curled armrests feature cream-colored trim, and the seat is positioned diagonally toward the front-right. Add the folded turquoise-blue fabric over its near side and place the small yellow book on the seating surface.
In front of the chair, position the small round wooden tea table. Place the pink teapot in the center, surrounded by matching teacups and saucers. The table should sit near the front edge of the platform without hanging over it.
To the right of the tea table, place the ornate cream-colored dessert trolley with curved metal legs and decorative scrollwork. Arrange the little pastries, cakes, and sweet treats on its upper tray, including the pink and yellow desserts.
The dessert trolley should stand close to the rounded front-right corner of the platform.
In Dreamy Room Level 929, these objects create a charming miniature tearoom beside the library. Keep the tea set, lounge chair, and dessert trolley grouped together.
When checking Dreamy Room Level 929, make sure the teapot and pastries remain visible and that the dessert trolley does not overlap the flower beds behind the lounge.
Step 13. Complete the Front-Left Art Studio with the Easel, Painting Supplies, and Storage Boxes.
The final major section of Dreamy Room Level 929 is the creative art studio along the left edge of the smaller platform. This section contains numerous tiny objects, making it one of the more demanding areas to organize.
Place the wooden easel near the front-left side, angled slightly toward the center of the room. Rest the mint-green painting canvas on it, displaying its delicate pink-and-purple artwork.
Beside the easel, arrange the painting supplies, including the small cups of paint, brushes, and containers. The blue-green paint bucket should sit near the easel's lower-right side, with a second container and paintbrushes positioned nearby.
Next, place the teal rectangular storage case near the front-left floor edge. Just in front of it, arrange the small pink and green tools or art supplies. Add the short round cream-colored cushioned stool between the supplies and the tea lounge.
Behind the easel, the narrow decorative railing and pedestal should remain visible, along with the plant arrangement and blue ornamental pieces.
In Dreamy Room Level 929, this compact art studio is easy to overlook because it contains so many small accessories.
Carefully compare the lower-left corner with the completed Dreamy Room Level 929 scene. The final arrangement should show a working artist's corner, with supplies concentrated around the easel and the nearby tea area left unobstructed.
Notes and Precautions
While completing Dreamy Room Level 929, several placement details deserve special attention:
- Place large structures first. The arched walls, windows, loft, and spiral staircase establish the room's layout. Incorrect positions may interfere with smaller furniture.
- Watch overlapping objects. The peacock and gramophone overlap visually with the central study area, while the staircase passes in front of bookshelves. These overlaps are part of the intended scene.
- Keep the two floor platforms distinct. In Dreamy Room Level 929, the smaller left extension contains the painting and tea areas, while the larger right platform accommodates the library, fireplace, and main seating.
- Do not mix up the desks. The large central desk has a golden balance scale and writing supplies. The much smaller desk belongs upstairs beside the candles and reading cushions.
- Check the tiny accessories carefully. Ink bottles, quills, pastries, teacups, decorative books, and painting tools may be difficult to position accurately.
- Pay attention to the furniture orientation. The pink armchairs face inward toward the center table, while the red writing chair belongs behind the desk.
- Use the completed image as the placement reference. The screenshots show the intended arrangement but do not establish a mandatory unpacking sequence, so the steps above provide a practical construction order.
The most common difficulty in Dreamy Room Level 929 is not identifying the decorative objects but finding their exact positions. If an item refuses to settle correctly, check nearby furniture, the underlying floor area, and possible visual overlaps before trying another location.
Tips and Tricks from top player
The following strategies can make Dreamy Room Level 929 easier to complete, especially when working with its numerous miniature decorations.
-
Work from back to front. Start with the arched walls, then add the upper library, staircase, main furniture, and front decorations. This reduces visual clutter while placing important objects.
-
Complete one area at a time. Divide Dreamy Room Level 929 into five zones: the rear windows, upper library, main study, right lounge, and left art-and-tea area. Finish each zone before moving to the next.
-
Use distinctive objects as landmarks. The golden chandelier, peacock, spiral staircase, red armchair, and green lamp are easy to recognize. Once they are correctly positioned, use them to guide the placement of smaller objects.
-
Place books after furniture. Dreamy Room Level 929 contains books on shelves, desks, tables, chairs, and the floor. Sorting them by their final location helps prevent confusion.
-
Handle tiny accessories last. Decorative items such as the teacups, feathers, scrolls, painting brushes, and candles are easier to position after the larger objects are secured.
-
Watch the edges of the rugs. The rectangular rug and oval rug indicate the boundaries of the main furniture groups. Use their edges to align the chaise, flower beds, and pink reading chairs.
-
Check the loft separately. The upper reading area contains several closely positioned objects. In Dreamy Room Level 929, placing the desk, stool, pillows, open book, and candles in the correct order of visual depth makes the scene easier to interpret.
-
Inspect any object that remains unplaced. Scan the completed image from the top-left corner to the bottom-right. Small objects can blend into the colorful decorations, particularly near the bookcases and art supplies.
Above all, patience and careful observation are the best strategies for Dreamy Room Level 929. Focus on matching each object's shape, orientation, and surrounding decorations rather than placing everything as quickly as possible.
Final Scene: A Magical Autumn Library in Dreamy Room Level 929
The completed Dreamy Room Level 929 transforms the once-empty platform into a beautiful autumn-inspired fantasy library. Three elegant ivory arches frame tall windows, flowing blue curtains, delicate green garlands, and a golden chandelier, while golden-leaved trees surround the peaceful interior.
On the right, a winding wooden staircase leads to a private reading loft filled with colorful books, soft purple cushions, and antique writing accessories. Below, two pink armchairs surround a cozy coffee table beside a glowing fireplace, with a globe, green floor lamp, and scattered books completing the atmosphere.
The central writing desk, tufted red chair, magnificent peacock, and flower-shaped gramophone create an elegant scholarly corner. Across the front-left extension, an art easel, painting supplies, red lounge chair, pink tea set, and miniature dessert trolley add warmth and personality.
With every object in its proper place, Dreamy Room Level 929 becomes a charming retreat celebrating reading, creativity, and the beauty of autumn.